The complexity of the types of water heaters, how to vent them, and what type is most suitable for your home may only be matched by the perceived complexity of your spouse when they want you to read their mind! Well maybe it’s not THAT bad, but there are a slew of requirements and safety precautions to take when installing a water heater.
Notice I didn’t say “Hot Water Heater”. Not to split hairs, but if the water is already hot, it doesn’t need heated. Contrarians may say that to stay hot, it needs be continually heated….but let’s get off this rabbit trail and back to the topic at hand.
Depending on the lingo used by the technician, there are 3 basic types of gas water heaters, and they are distinguished by the type of vent used to exhaust the by-products of combustion:
- Natural vented
- Direct vented
- Power vented
The purpose of this article is to enlighten you on the most common type of gas water heater… the naturally vented one. This is easily distinguished by the metal looking flue pipe that is on top of a draft hood at the top of the water heater. These are typically vented into an existing chimney or through the roof, depending on the layout of your home. The focus of this article is on properly venting this type of set up.
One of the most basic concepts in the installation of the venting system is the draft hood. The draft hood is a conical type metal shroud that sits on the top of the water heater over the exhaust port. One of the most common problems we see are when this draft hood is offset, crooked, lifted, or otherwise not secured in the exact place it should be. This will likely lead to improper drafting of the flue gasses.
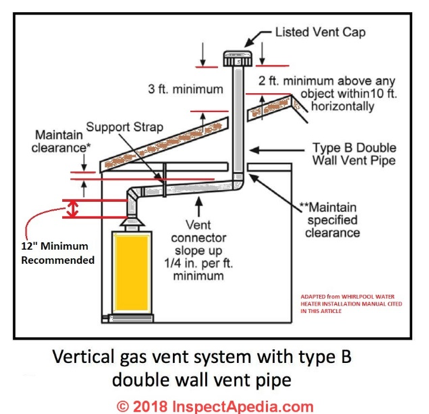
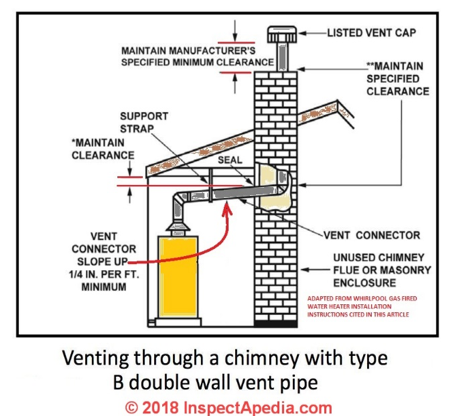
Assuming the draft hood is correct, the metal vent flue should be at least 26 gauge galvanized steel–Not metal dryer vent material or some other random metal uncle Billy Bob found in his back yard. The drafting of the flue gasses on this type of water heater uses the concept of ‘hot air rises’. There is no fan involved, so the flue should rise a minimum of ¼” per foot for the horizontal section until it exits through the roof, floor, or chimney. Failure to have a proper slope will create the potential for back drafting and carbon monoxide entry. Following are some common diagrams and regulations for water heating venting through the roof (left) and through an existing chimney (right):


Notice that the horizontal section requirements are ¼” per foot for both applications. It also should rise at least 12” on the top of the water heater before it turns horizontal.
Another important concept for the chimney vented model is the continuation of the flue vent up the chimney. The temptation for some installers is to just run the metal flue to the chimney wall, stop it, and call it good and let the flue gasses continue up the chimney. In certain situations, this can be done if it shares the flue with a natural vent furnace, but when it uses the chimney alone (called an orphaned water heater) the flue should continue up the chimney and have a proper termination cap at the top. That may be more information than you want or need, but like I mentioned in the first sentence, the requirements can be complex.
Why is continuing the flue pipe up the chimney important? Well put simply, the standard 3” vent on 30, 40, and 50-gallon water heaters is that size for a reason….to promote good drafting. Dumping it into a chimney which may have an 8” rectangular ceramic flue, 12” brick only flue (another no, no!) or other arrangement will allow the flue gasses to cool before completely exhausting up the chimney, condensing, and running back down the chimney chase. This is one reason why you can see corrosive evidence on metal flue pipes at the insertion point to a chimney.
The metal flue pipe should terminate above the roofline from 1-4 feet for roof slopes that are 7/12 to 12/12. Consult with local requirements for specifics in your area.
There are other requirements based on single walled or double walled flue pipe. Without getting stuck in the weeds too much, the double wall vent pipe should be connected at the draft hood with screws on the first section, but twist lock together at the other sections. Single wall pipe should be screwed together at each joint. The use of every man’s favorite fix material, duct tape, or even silver tape is not recommended to be used because it can trap moisture at the joints and hide potential holes that may potentially be dangerous areas for carbon monoxide.
Speaking of which….always install a carbon monoxide detector near the water heater area so you can add a degree of protection for potential changes in the venting. Simple things can make a perfectly installed vent dangerous. For example, if the termination cap is missing or damaged, birds could nest in the top of the pipe which blocks venting and dump the CO gasses into the house. You will likely not know this is happening initially and a CO detector is the only way to detect changes.
Note: It is ok to switch from single wall to double wall….in fact as the flue passes through an unconditioned space….think attic, it must be a double wall vent. This is important and single wall pipes are more susceptible to condensation damage and are not many folks check the flue or go into the attic more than once per year to scrounge around for Christmas lights and even then don’t look at the water heater flue….unless you are weird like me.
It is highly recommended that you have this information handy as you observe a qualified technician installing this in your house. Even the best information may leave something out that is critical to your safety and while we all need hot water (or at least want) it is not worth saving a few dollars for a potentially dangerous set up.
